Archive for Recipes

Faux Pear Custard

Faux Pear Custard

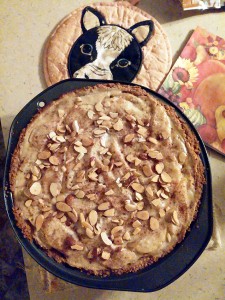
Faux Pear Custard is not overly sweet, but delicious

Autumn brings thoughts of apples, but this week I am thinking pears ….. Faux Pear Custard to be exact.

While this dish isn’t a typical custard, it isn’t a typical pie either. It’s similar to a quiche but without meat or vegetable in the filling. For that reason, I decided to call it a faux custard.

I peeled 8 medium-size ripe pears and brushed them with a mixture of lemon juice and water to keep them from browning. I set those aside and put the oven on 350 degrees to preheat while I prepared the crust and other ingredients.

For the crust I combined 1 1/2 cups of graham crackers that I had crumbled with 1/4 cup packed dark brown sugar and 1 stick (1/2 cup) melted butter in a bowl. I pressed this mixture into a 9-inch pie pan to form the crust. Place the crust in the refrigerator to firm while you prepare the filling.

Preparing Faux Pear Custard

Arrange pear slices in pan for Faux Pear Custard

Quarter the pears, remove the stems and seeds and slice into quarter-inch slices. In the top of a double boiler add 2 large eggs, 1/2 cup sour cream, 1/2 cup milk, 1/4 cup sugar and 2 tablespoons imitation vanilla flavoring. Using a whisk or immersion blender, combine well. Cook over medium heat about 5 minutes or until the mixture begins to coat the back of a spoon. Watch the mixture closely during this time so as not to scorch it. Set aside to cool.

Layer the pear slices in the pie pan. Sprinkle 1 tablespoon sugar and ground cinnamon to taste over the pears. Pour the cooled custard over the pears. Again sprinkle with ground cinnamon to taste. Place the pie pan on the middle rack of the preheated 350 degree oven for 45 minutes.

When done, remove from oven and top with sliced toasted almonds (optional). Let cool completely before serving to allow the custard to set firmly. This is delicious by itself or for an added treat top with whipped cream, ice cream or your favorite topping.

A slice of Faux Pear Custard

Let custard cool completely otherwise it will fall apart

Fall doesn’t have to be just for apples anymore. Enjoy this Faux Pear Custard as the temperatures begin to cool. Not overly sweet, this scrumptious dessert will delight your taste buds and have you asking for seconds. It stores well in the refrigerator though I doubt it will last more than a day before it’s all gone.

Thanks for visiting today. I hope you’ll give this simple dessert recipe a try. If you do, please be sure to stop back by and let me know how it turned out or if you post your outcome online attach the hashtag #thesurprisedgourmet. I’m always happy to hear how a recipe turns out for you and what you think of the results.

Cucina Felice!

Faux Pear Custard

Prep time: 

Cook time: 

Total time: 

Serves: 8 servings

Fall isn't just for apples when you can enjoy this delicious Faux Pear Custard
Ingredients
  • 8 Medium-size ripe pears
  • 1½ Cups graham crackers, crushed
  • ¼ Cup dark brown sugar
  • 1 Stick (1/2 cup) butter, melted
  • 2 Large eggs
  • ½ Cup sour cream
  • ½ Cup milk
  • ¼ Cup sugar
  • 2 Tablespoons imitation vanilla flavoring
  • TOPPING
  • 1 Tablespoon sugar
  • Ground cinnamon (to taste)
  • Sliced toasted almonds (optional)
Instructions
  1. Peel 8 medium-size ripe pears and brush them with a mixture of lemon juice and water to keep them from browning. Set those aside and put preheat the oven to 350 degrees.
  2. For the crust combine 1½ cups of graham crackers (crushed) with ¼ cup packed dark brown sugar and 1 stick (1/2 cup) melted butter. Press the mixture into a 9-inch pie pan to form the crust. Place the crust in the refrigerator to firm while preparing the filling.
  3. Quarter the pears, remove the stems and seeds and slice into quarter-inch slices. In the top of a double boiler add 2 large eggs, ½ cup sour cream, ½ cup milk, ¼ cup sugar and 2 tablespoons imitation vanilla flavoring. Using a whisk or immersion blender, combine well. Cook over medium heat about 5 minutes or until the mixture begins to coat the back of a spoon. Watch the mixture closely during this time so as not to scorch it. Set aside to cool.
  4. Layer the pear slices in the pie pan. Sprinkle 1 tablespoon sugar and ground cinnamon to taste over the pears. Pour the cooled custard over the pears. Again sprinkle with ground cinnamon to taste. Place the pie pan on the middle rack of the preheated 350 degree oven for 45 minutes.
  5. When done, remove from oven and top with sliced toasted almonds (optional). Let cool completely before serving to allow the custard to set firmly. This is delicious by itself or for an added treat top with whipped cream or ice cream.


*This post contains affiliate links.

Please follow and like us:

Potato Pancake Florentine

Potato Pancake for breakfast - The Surprised Gourmet

Potato Pancake Florentine is delicious for breakfast or dinner

Lately we seem to be on a food merry-go-around of sorts using the same ingredients everyday, but coming up with different dishes is how I created my Potato Pancake Florentine meal.

One of the main ingredients I tend to use a great deal is spinach. I use it instead of lettuce and find that I’m using it in more and more dishes. It’s one of those foods that we enjoy and besides, it’s good for you.

With my busy work schedule we only get to enjoy breakfast as a family on weekends and then sometimes only on Sundays. Because of this and the fact that it’s a meal we really enjoy, we have a habit of eating breakfast for dinner from time to time.

Deciding to combine breakfast and dinner the other evening I came up with these tasty potato pancakes filled with nutritious julienned  spinach.

It all started with 1 cup of leftover mashed potatoes. This is one dish that is so handy I’m tempted to make extra potatoes when I prepare them just so I’ll have leftovers to use in some other dish.

Potato Pancake - The Surprised Gourmet

A tasty dish the family will enjoy anytime of day

Putting a non-stick skillet on medium high, I gave it a splash (about 1 tablespoon) of Canola oil to make sure it was lightly coated. In a bowl, I slightly beat 2 large eggs, added the mashed potatoes, 1/4 cup milk, 1/4 cup plain flour, 1/4 teaspoon baking powder, a pinch of baking soda, 1/2 teaspoon Lawry’s Garlic Salt, 1/2 cup julienned deli-style ham, 1/3 cup julienned spinach, 5 leaves of basil (julienned), 1/4 cup shredded Mexican Blend cheese, fresh ground black pepper (to taste), and fresh ground kosher salt (to taste). I combined all the ingredients until it was a batter-consistency.

Using 1/3 cup measuring cup, I dropped the mixture into the hot skillet making the pancakes about 6 to 7 inches in diameter. I cooked them about 2 to 3 minutes until they were golden brown and could be flipped over without tearing apart.

Tasty Potato Pancakes - The Surprised Gourmet

Quick and easy Potato Pancake Florentine

In a cast iron skillet I scrambled 1 egg with Kraft Velveeta Sharp Cheddar Cheese for the garnish. On top of that I added 1 tablespoon of julienned ham and a dollop of sour cream with a wedge of a Roma tomato on the side.

Mashed potatoes (or creamed potatoes to some) are always good. I love potatoes just about any way you can prepare them. Are you a mashed potato fan? Have you used them in any other dishes as an ingredient?

Thanks for poppin in. Hope you’ll give this a try. If you do, be sure to stop back by and let me know how it turned out for you or if you post it online tag it with #thesurprisedgourmet.

Cucina Felice!

Potato Pancake Florentine

Rating 

Prep time: 

Cook time: 

Total time: 

Serves: 4 servings

You can enjoy this delicious Potato Pancake Florentine recipe for dinner or breakfast
Ingredients
  • 1 Cup mashed potatoes
  • 1 Tablespoon Canola oil
  • 2 Large eggs
  • ¼ Cup milk
  • ¼ Cup plain flour
  • ¼ Teaspoon baking powder
  • A pinch of baking soda
  • ½ Teaspoon garlic salt
  • ½ Cup deli-style ham, julienned
  • ⅓ Cup spinach, julienned
  • 5 Leaves of basil, julienned
  • ¼ Cup shredded Mexican Blend cheese
  • Fresh ground black pepper (to taste)
  • Fresh ground kosher salt (to taste)
  • GARNISH
  • 1 Large egg
  • 1 Slice Velveeta sharp cheddar cheese
  • 1 Tablespoon julienned ham
  • Dollop of sour cream
  • 1 Roma tomato, cut into wedges
Instructions
  1. Put a non-stick skillet on medium high, give it a splash (about 1 tablespoon) of Canola oil to make sure it was lightly coated. In a bowl, slightly beat 2 large eggs, added the mashed potatoes, ¼ cup milk, ¼ cup plain flour, ¼ teaspoon baking powder, a pinch of baking soda, ½ teaspoon garlic salt, ½ cup julienned deli-style ham, ⅓ cup julienned spinach, 5 leaves of basil (julienned), ¼ cup shredded Mexican Blend cheese, fresh ground black pepper (to taste), and fresh ground kosher salt (to taste). Combine all the ingredients until it is a batter-consistency.
  2. Using ⅓ cup measuring cup, drop the mixture into the hot skillet making the pancakes about 6 to 7 inches in diameter. Cook about 2 to 3 minutes until they are golden brown and can be flipped over without tearing apart.
  3. In a cast iron skillet scrambled 1 egg with Kraft Velveeta Sharp Cheddar Cheese for the garnish. On top of that add 1 tablespoon of julienned ham and a dollop of sour cream with a wedge of a Roma tomato on the side.


Please follow and like us:

Enjoy A Burrito

Easy Burritos - The Surprised Gourmet

Burritos are a quick and easy meal that is filled with loads of goodness

It’s the second day of October already, a good time to slow down your pace and enjoy a burrito.

The wonderful thing about burritos is you can use such a vast array of ingredients to fill them. Traditionally when you hear burrito you might think meat (usually ground beef) and refried beans as the filling along with some lettuce, tomatoes, cheese and sour cream. But you can also use rice, salsa, guacamole, chili peppers, well you get the picture.

You can even change things up and make the burrito for breakfast. These can include such fillings as scrambled eggs, potatoes, sausage, onions, and basically anything you want.

Burrito ingredients - The Surprised Gourmet

Fillings for burritos can be anything you like

I made a simple burrito the other night using a few ingredients we always have in the refrigerator. I heated the tortilla shells in the microwave for about 7 seconds just to make them easier to roll.

I put about a tablespoon of sour cream on each of the four tortilla shells and smoothed it out. Then I generously layered spinach (about a cup) over the sour cream. I followed that with slices of deli-style ham (three slices to a shell). I topped it off by sprinkling shredded Mexican Blend cheese (1/4 cup per shell) and putting a layer of thinly-sliced mushrooms down the center. I used one mushroom per shell saving several slices for the top. After rolling up the burritos, I added a little more sour cream, shredded cheese and the remaining slices of mushroom to the top of each.

Burritos on a plate - The Surprised Gourmet

Make your burritos simple or complicated

Burritos can be simple or as complicated as you want them to be. They’re a quick, easy and fun meal that can be filled with lots of tasty ingredients. You can load’em down so you have to use a fork to eat them or keep it simple so you can pick them up to eat. Either way, have fun with your food and add your favorite ingredients.

Stay traditional or think outside the box adding ingredients you’ve never had in a burrito before. There’s nothing set in stone that says you have to have things a certain way. Experimenting with food is one of the joys of cooking. You’ll be surprised sometimes by the wonderful dishes you create when you let your imagination take over.

Thanks for stopping by today. Are you a fan of burritos? What are your favorite ingredients? What’s the most unusual ingredient you’ve tried in a burrito? If you try this recipe, be sure to stop back by and let me know how you liked it or if you post it online include the tag #thesurprisedgourmet. Always like to know how the recipes turn out for you.

Cucina Felice!

Enjoy A Burrito

Prep time: 

Total time: 

Serves: 2 servings

Burritos can be made with a vast array of ingredients making them quick and easy to prepare.
Ingredients
  • 4 Tortilla shells
  • 4 Tablespoons sour cream
  • 1 Cup spinach
  • 12 Slices deli-style ham
  • 1 Cup shredded Mexican Blend cheese
  • 4 Mushrooms, thinly sliced
Instructions
  1. Warm tortilla shells in microwave for 7 seconds to make them easier to roll.
  2. Put about a tablespoon of sour cream on each of the four tortilla shells and smooth it out. Generously layer spinach over the sour cream. Follow that with 3 slices of deli-style ham per shell. Top it off by sprinkling ¼ cup shredded Mexican Blend cheese per shell and add a layer of thinly-sliced mushrooms down the center. Use one mushroom per shell saving several slices for the top. After rolling up the burritos, add a little more sour cream, shredded cheese and the remaining slices of mushroom on top.


Please follow and like us:

Red Wine Venison Roast

Red Wine Venison Roast

Red Wine Venison Roast, vegetables and mashed potatoes make a delicious meal

This recipe is in partnership with the International Wine of the Month Club.

Valle Secreto Key Cabernet Sauvignon Carmenére 2014 is a natural accompaniment to such a vast array of dishes it was perfect for my Red Wine Venison Roast.

While we definitely enjoy the delectable taste of a glass of the 2014 Key, its distinct flavors also enhances any food you cook with it. The unmistakable berry scents, woodland flavors and smooth textures intensifies the food making it a perfect pairing for venison. The 2014 Key offers up a set of captivating aromatics and flavors reminiscent of freshly picked blackberries and currants, spring woodlands and hints of dark chocolate and fresh brewed coffee – all of which are set in a body of silky tannins.

For those who may not be fond of venison, you can easily substitute beef or pork. However, I will tell you that prepared in this manner, you wouldn’t know it was venison when you taste it.

When cooking a roast in the slow cooker it’s always good to sear it first on the stove. I sprinkled the 3 pound roast with 2 tablespoons of flour and patted it in. With my pan on medium heat (#7 on my stove), I added 2 tablespoons of olive oil and then browned the roast on all sides. This helps seal in all those wonderful juices. Once it was browned, I let it rest while I prepared the other ingredients.

In the slow cooker

Red Wine Venison Roast in the slow cooker ready to cook

Since I didn’t want to have an extra-long cook time in the slow cooker, I sautéed my 3 large carrots (cut into diagonal chunks 1 ½-inches long), 2 large ribs of celery (cut into the same diagonals), and 1 ½ medium onions (cut into chunks) in a skillet with a tablespoon of olive oil. You want to keep a close eye on the vegetables so that they don’t burn and let them sauté about 7 minutes.

When the vegetables were ready, I placed them in the bottom of my slow cooker. Using a cup of the Cabernet Sauvignon Carmenére, I deglazed the pan I had sautéed the vegetables in making sure to scrape all the tasty little bits loose from the skillet. I pour this deglazed goodness over the vegetables in the slow cooker. Next I mixed 1 tablespoon of beef base with 1 cup of water and poured that over the vegetables. Then I added the roast (also pour in any juice that has accumulated on the plate) and 5 sliced button mushrooms. I topped everything off with ½ cup of the Cabernet Sauvignon Carmenére and set the slow cooker on high for 5 1/2 hours.

Delicious Red Wine Venison Roast

So tender the meat falls apart when removed from slow cooker

The aroma that filled the house for the next few hours was torture. It was so tempting to take the lid off the cooker and at least test some of the vegetables.

Finally the buzzer sounded and the roast was ready. I had prepared Mashed Potatoes to go with the roast and we were set to eat. But first, I poured the juices from the slow cooker into a sauce pan. I slowly stirred in a beurre manie (equal parts butter and flour) I had made until I got the sauce the thickness I wanted. I drizzled some of the sauce over the meat and put some in the center of the mashed potatoes. The sauce was so tasty on its own that it would have been perfect to dip bread sticks in.

The roast was so tender that the meat practically fell off the bone. It was moist and everything had such a rich flavor. For the first time I can remember, I didn’t even add any salt to the meal. We couldn’t carry on a conversation during dinner for oohing and aahing over our food. We paired the meal with some of the remaining wine and had a scrumptious treat.

If you’re a meat and potatoes guy like me, when you wrap your lips around this your body will begin to quiver and your mouth will explode with the wonderful flavors. You’ll think you’ve died and gone to meat and potatoes heaven.

This is one of those meals you can’t stop eating. It’s one where your belly doesn’t communicate with your mouth. Your belly is saying ‘whoa’ and your mouth is saying ‘go for more.’

Don’t worry about preparing a dessert with this meal because you’ll be going back for second helpings, it’s just inevitable. And you might want to plan on a large roast because any leftovers are just as flavorful the next day.

International Wine of the MonthClubs - The Surprised Gourmet

Wines from the International Wine of the Month Club

This splendid bottle of Valle Secreto Key was provided to me by the good folks at MonthlyClubs.com. When you join this fascinating club, you receive two expertly selected Estate Wines (such as the Cabernet Sauvignon Carmenére 2014) each month. You can choose to receive 2 reds, 2 whites or 1 of each (such as I received). The wine comes securely packaged and includes cellar notes describing the wine, pairings, a recipe and other wine-related tidbits. (*A recipe using a bottle of Pietra Santa Chardonnay 2014 will be forthcoming soon.)

Thanks for stopping by today. I hope you’ll try this delightful recipe, as well as the delectable wine. Do you cook with red wine? What do you enjoy most about cooking with wine? If you try this, be sure to drop back by and let me know how it went and if you decide post your results online, include the tag #thesurprisedgourmet. I’d love to know your thoughts on the recipe. Now a little something different. I’m closing with some comments in my own words today. I’m thinking of making that a regular part of the post, please feel free to share your thoughts on that. Would you like to hear more audio with the post or not at all?

Cucina Felice!

*This is a sponsored post and contains affiliate links. I was provided the wine mentioned above by MonthlyClubs.com, but the post was written solely by me and all opinions are my own given honestly and freely.

Red Wine Venison Roast

Rating 

Prep time: 

Cook time: 

Total time: 

Serves: 4-6 servings

This delectable Red Wine Venison Roast recipe will have your mouth watering before it's on your plate.
Ingredients
  • 3 Pound venison roast
  • 2 Tablespoons flour
  • 3 Tablespoons olive oil
  • 3 Large carrots, cut into diagonal chunks, 1 ½-inches long
  • 2 Large ribs of celery, cut into diagonal chunks, 1 ½-inches long
  • 1 ½ Medium onions cut into chunks
  • 1 Tablespoon beef base
  • 1 Cup water
  • 1 ½ Cups Cabernet Sauvignon Carmenére
  • 5 Button mushrooms, sliced
Instructions
  1. Sprinkle the 3 pound roast with 2 tablespoons of flour and pat it in. With pan on medium heat, add 2 tablespoons of olive oil and brown the roast on all sides. Once it is browned, let it rest while you prepare the other ingredients.
  2. Sauté 3 large carrots (cut into diagonal chunks 1 ½-inches long), 2 large ribs of celery (cut into the same diagonals), and 1 ½ medium onions (cut into chunks) in a skillet with a tablespoon of olive oil. Keep a close eye on the vegetables so that they don’t burn and let them sauté about 7 minutes.
  3. When the vegetables were ready, place them in the bottom of a slow cooker. Using a cup of the Cabernet Sauvignon Carmenére, deglaze the vegetable pan making sure to scrape all the tasty little bits loose from the skillet. Pour this deglazed goodness over the vegetables in the slow cooker. Next mix 1 tablespoon of beef base with 1 cup of water and pour it over the vegetables. Add the roast (also pour in any juice that has accumulated on the plate) and 5 sliced button mushrooms. Top everything off with ½ cup of the Cabernet Sauvignon Carmenére and set the slow cooker on high for 5½ hours.
  4. When the roast is ready take it out of the slow cooker and set aside. Pour the juices from the slow cooker into a sauce pan. Slowly stir in a beurre manie (equal parts butter and flour) until the sauce gets the desired thickness. Drizzle the sauce over the meat and vegetables.


Please follow and like us:

Everybody Loves Meatloaf

Slice of Everybody Loves Meatloaf - The Surprised Gourmet

Delicious meatloaf is a family favorite

It’s been a busy weekend so today I’m sharing my recipe for a family favorite, ‘Everybody Loves Meatloaf’.

When making my meatloaf I start by dicing a medium sweet onion (such as a Vidalia) into ¼-inch cubes and sautéing it in a tablespoon of Canola oil. This softens it up a bit before going into the meatloaf. I add 1 tablespoon of minced garlic, ¼ teaspoon fresh ground kosher salt and ¼ teaspoon fresh ground black pepper and sauté another minute. Preheat oven to 350 degrees.

Everybody Loves Meatloaf ready for the oven

Everybody Loves Meatloaf ready for the oven

In a bowl combine the above ingredients with a can (14.5 ounces) of diced tomatoes, 1 teaspoon dried oregano, 1 tablespoon dried parsley, 2 large eggs (beaten), 2 ½ cups bread crumbs, 1 pound ground beef, 1 cup finely shredded sharp cheddar cheese, and 1 cup Bull’s Eye Carolina BBQ Sauce (or your favorite brand of BBQ sauce). Make sure to incorporate all the ingredients well.

If you find yourself without a meatloaf pan, try this little trick. Use a pizza pan covered in aluminum foil.

Place meat mixture in a meatloaf pan or mold into loaf shape on the pizza pan. Cover with paprika and bake in preheated oven for one hour. Check meatloaf after an hour’s cook time as oven temperatures vary and your meatloaf may need to cook a bit more.

The wonderful thing about meatloaf recipes is that every family seems to have their favorite. It’s a great recipe to make for a dinner meal and the leftovers make delicious sandwiches the next day.

Thanks for stopping by today. Do you have a tried and true meatloaf recipe that has been handed down in your family for generations? Do you have a meatloaf recipe that you hope will become your family’s dish to carry on for generations? I hope you’ll give this dish a try. If you do, be sure to drop back by and let me know how it turned out or if you post it include the tag #thesurprisedgourmet. I’m always happy to know how the recipe turned out for you.

Cucina Felice!

Everybody Loves Meatloaf

Rating 

Prep time: 

Cook time: 

Total time: 

Serves: 6-8 servings

This is a family favorite recipe that everyone will enjoy for years to come
Ingredients
  • 1 Medium sweet onion, diced ¼-inch cubes
  • 1 Tablespoon Canola oil
  • 1 Tablespoon minced garlic
  • ¼ Teaspoon fresh ground kosher salt
  • ¼ Teaspoon fresh ground black pepper
  • 1 Can (14.5 ounces) diced tomatoes
  • 1 Teaspoon dried oregano
  • 1 Tablespoon dried parsley
  • 2 Large eggs, beaten
  • 1 Pound ground beef
  • 2 ½ Cups bread crumbs
  • 1 Cup finely shredded sharp cheddar cheese
  • 1 Cup BBQ sauce
Instructions
  1. Preheat oven to 350 degrees
  2. Sauté a medium sweet onion (that has been diced into ¼-inch cubes) in a tablespoon of Canola oil. This softens it up a bit before going into the meatloaf. Add 1 tablespoon of minced garlic, ¼ teaspoon fresh ground kosher salt and ¼ teaspoon fresh ground black pepper and sauté another minute.
  3. In a bowl combine the above ingredients with a can (14.5 ounces) of diced tomatoes, 1 teaspoon dried oregano, 1 tablespoon dried parsley, 2 large eggs (beaten), 2 ½ cups bread crumbs, 1 pound ground beef, 1 cup finely shredded sharp cheddar cheese, and 1 cup Bull’s Eye Carolina BBQ Sauce (or your favorite brand of BBQ sauce). Make sure to incorporate all the ingredients well.
  4. If you find yourself without a meatloaf pan, try this little trick. Use a pizza pan covered in aluminum foil.
  5. Place meat mixture in a meatloaf pan or mold into loaf shape on the pizza pan. Cover with paprika and bake in preheated oven for one hour. Check meatloaf after an hour’s cook time as oven temperatures vary and your meatloaf may need to cook a bit more.


Please follow and like us:

Bread Bowl Chicken Salad Soup

Bread Bowl Chicken Salad Soup - thesurprisedgourmet.com

Bread Bowl Chicken Salad Soup perfect for an evening meal

Cooler temperatures bring to mind comforting soups and Bread Bowl Chicken Salad Soup is a new addition to our list of favorites.

Instead of making a traditional vegetable soup or a soothing chicken noodle soup, I wanted something just a bit different. It wasn’t until the soup was almost done when I decided to add the most unique ingredient – homemade Simply Chicken Salad.

Simply Chicken Salad is a favorite dish at our house and seems to be in the refrigerator every other week. I couldn’t resist adding some to the soup just to see how it would turn out.

I baked the Tuscan Bread Bowl in the oven according to the package instructions. After baking, I cut off the top, scooped out the center and returned it to the oven for the bowl to set.

I chopped and diced all of my ingredients prior to starting the soup so that it would go much smoother and quicker. Using a 2 quart stock pan, I added my ingredients starting with the 2 ½ tablespoons of canola oil and 1 tablespoon butter. Next I added the cup of finely diced carrots, a cup of finely diced celery, 1 ½ cups of corn that I had cut off of the cob, ¼ cup of finely diced onion, and 2 finely diced Roma tomatoes.

The dry ingredients came next: 1 tablespoon dried oregano, 2 tablespoons dried parsley, 1 tablespoon dried basil, 1 tablespoon garlic salt, and 1 teaspoon powdered chicken bouillon. Mixing that well I added 1 tablespoon minced garlic, 1 can English peas, and 3 cups of chicken stock.

Cooking the soup - thesurprisedgourmet.com

The ingredients for Bread Bowl Chicken Salad Soup cooking

The chicken stock I used was frozen as ice cubes and worked great for adding to this soup. Anytime you have leftover chicken stock don’t throw it away, instead freeze it in ice trays. When the stock is frozen, pop it out of the ice trays and put it in freezer bags in your freezer. It’s a handy way to use up your stock and have small amounts when you need it. You can measure how much goes into a cube and then you’ll be able to add just the right amount when needed. My cubes equaled 1 ½ tablespoons each.

When my soup was just about ready, I decided to add in a cup of homemade Simply Chicken Salad. This gave the soup a different texture and even more flavor. I let it cook just a few minutes more to mingle all the flavors together. As I removed it from the heat, I added the final two ingredients – ¾ cup sour cream and 1/3 cup shredded mild cheddar cheese – making sure to incorporate the new ingredients with the soup.

The results was a rich and creamy texture with such aromas you won’t believe. I put a couple of dippers of soup in the bread bowl and started to add another dab of sour cream, but decided against it. The fragrant soup was delicious with the occasional bits of bread coming off the sides of the bread bowl.

This is like most soups that contains vegetables, you can use any combination of vegetables you like. It doesn’t matter what you want, it usually works well in a soup.

Thanks for visiting today. I hope you’ll give this soup a try. If you do, please drop back by and let me know how it went or if you post about it be sure to tag it with #thesurprisedgourmet. I’m always happy to know how the recipes turn out for you.

Cucina Felice!

Bread Bowl Chicken Salad Soup

Prep time: 

Cook time: 

Total time: 

Serves: 4-5 servings

A delectable soup in a bread bowl that makes cool fall evenings warmer.
Ingredients
  • 2 ½ Tablespoons Canola oil
  • 1 Tablespoon butter
  • 2 carrots, peeled and finely diced (1 cup)
  • 3 ribs of celery, finely diced (1 cup)
  • 2 ears of fresh corn, kernels cut off (1 ½ cups)
  • Half of a sweet onion, finely diced (1/4 cup)
  • 2 Roma tomatoes, seeded and finely diced
  • 1 Tablespoon dried oregano
  • 2 Tablespoons dried parsley
  • 1 Tablespoon dried Basil
  • 1 tablespoon minced garlic
  • 3 Cups chicken stock
  • 1 Cup homemade chicken salad
  • 1 Can (15 ounce) English peas
  • 1 Teaspoon powdered chicken bouillon
  • 1 Tablespoon garlic salt
  • ¾ Cup sour cream
  • ¼ Cup shredded mild cheddar cheese
Instructions
  1. Preheat oven to 400 degrees.
  2. Place Tuscan Bread Bowl in preheated oven and cook as directed on package. When the bowl is ready, remove it and turn the oven to 550 degrees. Slice off the top of the bread bowl and crave out the center. Place the bowl back in oven at 550 degrees for 5 minutes to set the bowl.
  3. Take 4 quart stock pot, put in 2 ½ tablespoons Canola oil, 1 tablespoon butter and let it come up to medium high. Add 1 cup carrots, 1 cup celery, ¼ cup onion, 1 tablespoon minced garlic, 1 tablespoon basil, and 1 tablespoon oregano.
  4. Sauté for about 2 minutes, add 1 ½ cups fresh cut corn from the cob, and 2 tablespoons parsley. Next add 1 cup tomatoes, stir well and add 3 cups of chicken stock. Add 1 cup of homemade chicken salad, 1 can (15 ounces) English peas (15 ounces), 1 teaspoon powder chicken bouillon, and 1 tablespoon Lawry’s garlic salt. Let this soup simmer for about 50 minutes all together or longer if you desire.
  5. When it’s taken off the stove add ¾ cup sour cream, ¼ cup shredded cheese and mix well. Ladle soup into bread bowl. You can garnish it with additional sour cream and shredded cheese, if desired.


Please follow and like us:
« Older Entries Recent Entries »