Archive for Main

Share a Pork and Brown Rice Casserole

Pork and Rice Brown Casserole

This scrumptious dish is great to carry to family gatherings,

In the South we tend to offer food for various occasions so next time you need a dish share a Pork and Brown Rice Casserole.

It’s probably the same way in other areas and countries around the world, but we like to think we’re different. We Southerners like to share our food when someone is sick, someone marries, someone has a baby, someone moves into a new home, someone dies.

You get the picture, we will share food at the drop of a hat. For any reason or no reason at all, we love to share our food. And, it doesn’t always have to be food you’ve prepared yourself. But, you’ll want to put that bought food on a nice dish to make’em think you made it yourself (even though they’ll know the truth).

Making Pork and Brown Rice Casserole

Preparing Pork and Brown Rice Casserole

A favorite food to carry (or to have at family gatherings) is a casserole. It’s usually a quick and easy, everything-in-one meal that can be cooked and served in the same casserole pan.

I recently threw together a Pork and Brown Rice Casserole for us one night because we’d just picked up brown rice at the grocery story that day. It turned out to be quite good, but much more than our family would eat. I took some to work the next day and shared with friends to rave reviews. I hope you’ll give it a try and find you like it just as well.

I cooked my brown rice according to the package instructions preparing enough for 1 1/2 cups and set the oven to 350 degrees to preheat.

Pork and Brown Rice Casserole out of the oven

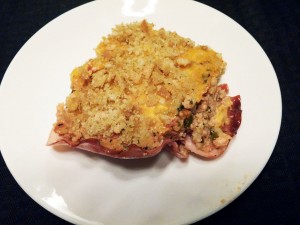
Pork and Brown Rice Casserole fresh out of the oven and ready to eat

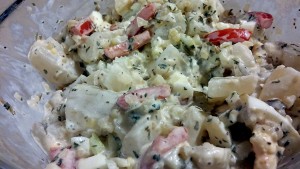
With a skillet on medium heat, I added 1/4 cup chopped onions, 1 tablespoon dried parsley, 1 tablespoon minced garlic, 1 can (14.5 ounces) petite diced tomatoes, 1/2 tablespoon dried oregano, 1/2 tablespoon dried basil, 1 cup minced bell pepper, 1 1/2 teaspoon fresh ground kosher salt, 1/4 teaspoon fresh ground black pepper, and 2 cups ground pork. I let it cook for about 5 minutes and then I added the 1 1/2 cups of brown rice. Stirring well, I let this simmer while I prepared the casserole dish.

I generously buttered a 2 quart casserole dish. Next I layered the bottom and sides with deli-style ham (using approximately 14 slices, varying on size of ham slices). Over that I sprinkled 3/4 cup Kraft Shredded Mild Cheddar Cheese making sure the bottom was completely covered.

I poured the pork and rice mixture over the cheese and ham. I topped off the casserole with 1 cup Kraft Shredded Mild Cheddar Cheese and 3/4 cup crushed and buttered croutons. I placed the dish in a preheated 350 degree oven on the middle rack and baked for approximately 25 minutes.

Thanks so much for stopping by today. Do you take food to gatherings where you live? I hope you’ll give this casserole a try. If you do, please come back and let me know how it was or if you post it online tag it #thesurprisedgourmet. I’d love to know what you think.

Cucina Felice!

Share a Pork and Brown Rice Casserole

Rating 

Prep time: 

Cook time: 

Total time: 

Serves: 6-8 Servings

This delicious Pork and Brown Rice Casserole is perfect for family gatherings as a quick and easy meal.
Ingredients
  • 1½ Cups cooked brown rice
  • ¼ Cup minced onions
  • 1 Tablespoon dried parsley
  • 1 Tablespoon minced garlic
  • 1 Can (14.5 ounces) petite diced tomatoes
  • ½ Tablespoon dried oregano
  • ½ Tablespoon dried basil
  • 1 Cup minced bell pepper
  • 1½ Teaspoon fresh ground kosher salt
  • ¼ Teaspoon fresh ground black pepper
  • 2 Cups cooked ground pork
  • 1¾ Cup Shredded mild cheddar cheese
  • 14 Slices deli-style ham
  • ¾ Cup Crushed and buttered croutons
Instructions
  1. Preheat oven to 350 degrees.
  2. Prepare 1½ cups brown rice as directed on the package. Set aside.
  3. With a skillet on medium heat, add ¼ cup chopped onions, 1 tablespoon dried parsley, 1 tablespoon minced garlic, 1 can (14.5 ounces) petite diced tomatoes, ½ tablespoon dried oregano, ½ tablespoon dried basil, 1 cup minced bell pepper, 1½ teaspoon fresh ground kosher salt, ¼ teaspoon fresh ground black pepper, and 2 cups cooked ground pork. Let it cook for about 5 minutes and then add the 1½ cups of brown rice. Stirring well, let this simmer while you prepare the casserole dish.
  4. Generously butter a 2 quart casserole dish. Next layer the bottom and sides with deli-style ham (using approximately 14 slices, varying on size of ham slice). Over that sprinkled ¾ cup shredded mild cheddar cheese making sure the bottom is completely covered.
  5. Poured the pork and rice mixture over the cheese and ham. top off the casserole with 1 cup shredded mild cheddar cheese and ¾ cup crushed and buttered croutons. Place the dish in a preheated 350 degree oven on the middle rack and baked for approximately 25 minutes.


Please follow and like us:

Brunswick Stew Hits the Spot

A dish of Brunswick stew always hits the spot

A dish of Brunswick stew always hits the spot

Living in the South when the weather has a touch of Autumn in it, you can’t help but think of good old Brunswick stew. It always hits the spot.

Of course you can buy Brunswick stew by the gallon container, but the real fun comes when you make your own. Some people  cook the stew outdoors in cast iron pots. Some recipes are handed down from generation to generation and guarded as prized family secrets.

For those of us who have busy work schedules and little time to spend  watching stew cook, I use a slow cooker.

I adapted my Brunswick stew recipe from a 100-year-old recipe given to my mother by the pastor’s wife of her church a number of years ago. I left a few ingredients out and added several new ones.

I started by skinning and cooking 7 leg quarters in a slow cooker. Be sure to save the broth for stock. You can freeze the broth in ice trays and use the cubes when needed. Each cube holds about 1 and a half tablespoons of broth.

Brunswick stew is delicious as temperatures cool

Brunswick stew is delicious as temperatures cool

When the chicken was done and deboned, it made approximately 5 cups. I placed that in another slow cooker and added the following ingredients: 1 can (14 1/2 ounces) cream style corn; 1 can (14 1/2 ounces) tomato, okra, corn mixture; 1 can (14 1/2 ounces) cut okra (this I drained); 1 can (14 1/2 ounces) petite diced tomatoes; 1 1/2 cups of ketchup; 1/4 cup of Worcestershire sauce;  1 tablespoon of sugar; 1 tablespoon of apple cider vinegar; 1 teaspoon of Lawry’s Garlic Salt; and 3 (3 1/2 ounces) jars of cocktail onions. You could use 1/2 cup of chopped onions instead, but I had the cocktail onions and wanted to see how they would do. They turned out great, but look like peeled white grapes in the stew.

Once all the ingredients were in the slow cooker, I gave them a good stir and added 2 cups of the chicken broth I had saved. Once everything was combined well, I set the slow cooker on low and let it cook for 2 hours.

After 2 hours, the stew was ready to eat. However, I continued to let it cook on low for several more hours just to allow all the ingredients to blend together well. Besides, everyone knows the longer you cook Brunswick stew – the better it gets.

Thanks for stopping by today. Do you have a favorite Brunswick stew recipe or a traditional way of preparing it? If you give this a try, be sure to drop back by and let me know how it turns out or tag it with #thesurprisedgourmet. I’d love to know how it went.

Cucina Felice!

Brunswick Stew Hits the Spot

Rating 

Prep time: 

Cook time: 

Total time: 

Serves: 8 servings

Brunswick stew is a Southern tradition that hits the spot when temperatures begin to cool.
Ingredients
  • 5 Cups of cooked chicken
  • 1 Can (14½ ounces) cream style corn
  • 1 Can (14½ ounces) tomato, okra, corn mixture
  • 1 Can (14½ ounces) cut okra (drained)
  • 1 Can (14½ ounces) petite diced tomatoes
  • 1½ Cups of ketchup
  • ¼ Cup of Worcestershire sauce
  • 1 Tablespoon of sugar
  • 1 Tablespoon of apple cider vinegar
  • 1 Teaspoon of Lawry's Garlic Salt
  • 3 (3½ ounces) Jars of cocktail onions (or ¼ cup of chopped onions)
  • 2 Cups Chicken stock
Instructions
  1. Place all ingredients in slow cooker. Stir well and cook on low for 2 hours. It can be cooked longer, if desired.


Please follow and like us:

Homemade Potato Salad

Homemade Potato Salad - The Surprised Gourmet

Homemade Potato Salad is a ‘must’ for most family gatherings.

Nothing says summer outings quite like a big bowl of delicious Homemade Potato Salad. Even with the cooler temperatures on the horizon, this tasty dish adds to any gathering.

Potato salad is a staple of most any outdoor gathering, family get-together or social event. Because of that, you’ll find more ways to make potato salad than you could make in a year’s time. Some recipes are very basic and simple, while others are more complex and take a little more time to prepare.

My recipe is a simple one I’ve adapted over the years. I think it’s the way I put it together that is a bit different than most potato salads you come across in the South. I don’t put all my ingredients together and mix them. Using all the ingredients except the potatoes, I make a dressing that I pour over the potatoes and fold in.

I start by peeling 5 medium Russet potatoes then slice and cut into cubes about 3/4 of an inch. I rinse these in cold water several times before putting them on the stove to cook on high. When they come to a boil, I cook them for about 6 to 7 minutes. You want them done, but not falling apart.

While the potatoes cook, I dice up 1/2 cup of onions and 1/2 cup of celery. I put 3 large eggs on to boil. Taking 2 large Roma tomatoes, I quarter them length-wise and seed them and cut them across into 1/4 inch slices.

Bowl of Potato Salad - The Surprised Gourmet

Homemade Potato Salad goes with outdoor fun

I mix the onions, celery, and tomatoes with 1 tablespoon of Dijon mustard, 1 teaspoon of celery seed, 1 1/2 tablespoons of dried parsley, 3/4 cup of mayonnaise, and 1 1/4 cup of sweet pickle relish for a tasty dressing. I dice 2 of the hard boiled eggs and add that to the dressing mixture. I slice the other egg and use it for a garnish on top of the potato salad.

When the potatoes are done, I drain them and let them stand for a few minutes to cool off. Next place the potatoes in a bowl and pour the dressing mixture over them. Stir the dressing and potatoes together gently. You don’t want to break the potatoes apart otherwise it will turn into a dish more like mashed potatoes rather than potato salad.

Potato Salad - The Surprised Gourmet

Homemade Potato Salad is a tasty meal on its own

Place the egg slices over the top of the potato salad and then sprinkle with paprika, if desired.

This savory dish makes a great addition to any meal (indoors or out), as well as being a tasty course all on its own.

Thanks for dropping in today. Does your family have a favorite potato salad recipe? Is potato salad one of those dishes that is a ‘must’ at every family get-together? I hope you’ll try this recipe and come back to let me know how it turned out for you or just tag it #thesurprisedgourmet if you post about it. I’d love to know how it goes.

Cucina Felice!

Homemade Potato Salad

Prep time: 

Cook time: 

Total time: 

Serves: 6-8

This tasty Homemade Potato Salad is a 'must' for all your family gatherings.
Ingredients
  • 5 Medium Russet potatoes, peeled and cubed
  • 3 Large eggs
  • ½ Cup diced onion
  • ½ Cup diced celery
  • 1¼ Cup sweet pickle relish
  • ¾ Cup mayonnaise
  • 1 Tablespoon Dijon mustard
  • 1 Teaspoon celery seed
  • 1½ Tablespoons dried parsley
  • 2 Large Roma tomatoes, quartered and sliced
  • Paprika (if desired)
Instructions
  1. Start by peeling 5 medium Russet potatoes then slice and cut into cubes about ¾ of an inch. Rinse these in cold water several times before putting them on the stove to cook on high. When they come to a boil, cook them for about 6 to 7 minutes. You want them done, but not falling apart.
  2. While the potatoes cook, dice up ½ cup of onions and ½ cup of celery. Put 3 large eggs on to boil. Taking 2 large Roma tomatoes, quarter them length-wise and then seed and cut them crosswise into ¼ inch slices.
  3. Mix the onions, celery, and tomatoes with 1 tablespoon of Dijon mustard, 1 teaspoon of celery seed, 1½ tablespoons of dried parsley, ¾ cup of mayonnaise, and 1¼ cup of sweet pickle relish for a tasty dressing. Dice 2 of the hard boiled eggs and add that to the dressing mixture. Slice the other egg and use it for a garnish on top of the potato salad.
  4. When the potatoes are done, drain them and let them stand for a few minutes to cool off. Next place the potatoes in a bowl and pour the dressing mixture over them. Stir the dressing and potatoes together gently. You don't want to break the potatoes apart otherwise it will turn into a dish more than mashed potatoes rather than potato salad.
  5. Place the egg slices over the top of the potato salad and then sprinkle with paprika, if desired.


Please follow and like us:

Stuffed Mushrooms

Stuffed mushrooms pair well with steamed broccoli and corn on the cob

Stuffed mushrooms pair well with steamed broccoli and corn on the cob

Stuffed mushrooms are another one of those dishes that can be prepared in so many various ways that you just can’t go wrong.

Mushrooms are a hit at our house no matter how they’re prepared. I decided to stuff some the other evening, but wanted something different in them. As I gathered my usual suspects of ingredients, I saw a container of a fresh dried herb we had and thought, ‘Why not?’

I started by peeling one small carrot, then used the peeler to cut thin slices of the carrot that I then chopped into confetti. This made about 1/4 cup. Next I finely chopped a white onion for 3 tablespoons.

Stuffed mushrooms sprinkled with cheese ready for the oven

Stuffed mushrooms sprinkled with cheese ready for the oven

Using 12 ounces of white mushrooms, I cleaned them with a damp cloth and then removed the stems by simply pulling them out. People have different thoughts when it comes to washing mushrooms. Some say you should just dust them with a paper towel, others say wipe them with a damp cloth, and others say you should give them a good wash under the faucet. Since mushrooms soak up water, I like to just wipe mine off with a damp cloth.

After removing the stems, I cut the holes a little more to allow additional room for filling. I finely chopped the extra mushrooms I removed, along with the stems.

I put the chopped mushrooms, onions, and carrots into a heated skillet on medium heat with 2 tablespoons of butter and 2 tablespoons of Canola oil. I added a pinch of freshly ground black pepper, a pinch of freshly ground Kosher salt, stirred well and sautéed for 3 minutes. Next I added 1 tablespoon of minced garlic (I use Spice World) and sautéed another 2 minutes. Then came time for the fresh dried herb — I added 1/2 teaspoon of sage that I had rubbed into a powder, mixed well and cooked for 5 more minutes.

Meanwhile, I had buttered a 3 quart casserole dish. When the mixture in the skillet was done, I poured it into a bowl adding 3 tablespoons of dried bread crumbs, 1/4 teaspoon of Kosher salt, and 2 tablespoons of grated Parmesan cheese (you could use freshly grated Parmesan).

Combining the ingredients well, I filled the mushroom caps with the mixture, placed them in the casserole dish and sprinkled with shredded cheese. I placed them in a preheated 350 degree oven for 20 minutes. You may need to cook your mushrooms a little longer depending on their size and the temperature of your oven. This makes about 5 to 6 servings.

Before I put the mushrooms in the oven, I decided to prepare corn on the cob to go with it.

Corn on the Cob baked in the oven

Corn on the Cob baked in the oven

Pulling back the shucks on the corn, I removed the silks. Next I liberally rubbed a stick of cold butter over each cob. Once they were coated in butter, I sprinkled each with freshly ground Kosher salt, Italian Seasoning, and paprika. I pulled the shucks back down over the corn, wrapped them separately in aluminum foil and placed them on the middle rack of the 350 degree oven. I baked these for 30 minutes. Here again, your baking temperature could be different depending on the size of the corn cob and your oven.

To round out the meal I took a head of broccoli and cut it into florets. You can keep the stem and use it for stock or simply cut it into pieces to use too. This time I just discarded it. I sautéed the florets in a skillet with 2 tablespoons of butter and a touch of Canola oil (about a tablespoon) making sure all the broccoli was covered with the butter/oil. After cooking for 5 minutes, I put a lid on the skillet, turned the heat to simmer and let the broccoli steam for another 3 minutes.

This is how a taste for stuffed mushrooms turned into a complete meal. Thanks for stopping by. If you try one or all of these recipes, come back and tell us how it was or tag it with #thesurprisedgourmet. I’d love to know how it turns out for you.

Cucina Felice!

Stuffed Mushrooms

Prep time: 

Cook time: 

Total time: 

Serves: 5-6 servings

This yummy dish goes well with steamed broccoli and baked corn on the cob
Ingredients
  • 12 Ounces white mushrooms
  • ¼ Cup carrot (peeled, sliced and turned into confetti)
  • 3 Tablespoons finely chopped onion
  • 2 Tablespoons butter
  • 2 Tablespoons Canola oil
  • 1 Tablespoon minced garlic
  • ½ Teaspoon fresh dried sage (made into a powder)
  • 3 Tablespoons bread crumbs
  • 2 Tablespoons grated Parmesan cheese
  • Freshly ground black pepper (to taste)
  • Freshly ground Kosher salt (to taste)
  • Shredded cheese for topping (optional)
Instructions
  1. Preheat oven to 350 degrees.
  2. Started by peeling one small carrot, then used the peeler to cut thin slices of the carrot , chop that into confetti. This made about ¼ cup. Next finely chopped a white onion for 3 tablespoons.
  3. Using 12 ounces of white mushrooms, clean them with a damp cloth and then removed the stems by simply pulling them out.
  4. After removing the stems, cut the holes a little more to allow additional room for filling. Finely chop the extra mushrooms removed, along with the stems.
  5. Put the chopped mushrooms, onions, and carrots into a heated skillet on medium heat with 2 tablespoons of butter and 2 tablespoons of Canola oil. Add a pinch of freshly ground black pepper, a pinch of freshly ground Kosher salt, stirred well and sautéed for 3 minutes. Next add 1 tablespoon of minced garlic and sautéed another 2 minutes. Then add ½ teaspoon of sage rubbed into a powder, mixed well and cooked for 5 more minutes.
  6. Meanwhile, butter a 3 quart casserole dish. When the mixture in the skillet is done, pour it into a bowl adding 3 tablespoons of dried bread crumbs, ¼ teaspoon of Kosher salt, and 2 tablespoons of grated Parmesan cheese (you could use freshly grated Parmesan).
  7. Combining the ingredients well,fill the mushroom caps with the mixture, placed them in the casserole dish and sprinkled with shredded cheese. Place them in a preheated 350 degree oven for 20 minutes. You may need to cook your mushrooms a little longer depending on their size and the temperature of your oven.


Please follow and like us:

French Onion Soup

French Onion Soup with a dollop of sour cream and homemade croutons.

French Onion Soup with a dollop of sour cream and homemade croutons.

I decided to make my version of French Onion Soup the other evening and it got me to thinking about the many variations of this tantalizing dish.

I’ve seen recipes in numerous cookbooks and each one is a bit different. And if you Googled for a recipe, I’m sure you could find enough information to keep you reading for days.

I like my version for this soup because the onions turn a golden brown, the onions still have enough texture you can bite into them, and it just plain taste good!

I start with a 6 quart stock pot (you could use a 4 quart if you prefer). I put in 1/4 cup Canola oil and 1/4 cup butter or margarine. Meanwhile, I take 2 pounds of white onions, cut them in half and then cut them into 1/4-inch slices.

I place the onions in the pot on medium heat, stir them a bit and then put the lid on I cook the onions down until they caramelize before I add any water. After the onions have cooked for about 10 minutes, I stir them good and turn my stove eye down to 4 (5 is medium on my stove). After another 10 minutes and another good stir, I turn the stove down to 3.

After the onions have cooked 30 minutes, I add 1 tablespoon of sugar, 1 tablespoon of minced garlic (I use Spice World), and 1 tablespoon of beef bouillon paste (sometimes I use chicken bouillon).

Onions cooking down for French Onion Soup

Onions cooking down for French Onion Soup

I let the onions continue to cook slowly keeping a close watch not to let them burn or scorch. When the onions cook slowly it lets them develop more sugar naturally giving the soup a sweeter flavor without having to add so much sugar.

While the onions are cooking slowly I remove the lid allowing more of the liquids to escape and the onions to cook down more. During this time the onions begin to turn a golden brown and the smell coming out of the pot will make your mouth water. My method may seem like it takes a long time, but it’s well worth the effort. Just remember to keep a close eye on the onions stirring often to keep them from burning as they caramelize.

Once they reach that golden brown consistency (about another 20 minutes), I add 7 cups of water and cook for an additional 2 minutes.

A bowl of French Onion Soup will hit the spot anytime of the season

A bowl of French Onion Soup will hit the spot anytime of the season

When the soup is ready, ladle it into bowls, add a dollop of sour cream and serve with homemade croutons. Hmmmmm….now that’s good.

This is a savory dish that is great for movie night with the family or Sunday lunch with friends.

Thanks for stopping by today. What’s your favorite onion soup recipe? Do you have a special time of the year you serve it? If you try this recipe, come back and tell us what you think or tag it with #thesurprisedgourmet. I’d love to know hot it was.

Cucina Felice!

French Onion Soup

Rating 

Prep time: 

Cook time: 

Total time: 

Serves: 7-8 servings

This savory dish will be a hit with family and friends no matter the season.
Ingredients
  • ¼ Cup Canola oil
  • ¼ Cup butter or margarine
  • 2 Pounds white onions, cut in half and then cut into ¼-inch slices
  • 1 Tablespoon sugar
  • 2 Tablespoons minced garlic
  • 1 Tablespoon beef bouillon paste
  • 7 Cups of water
Instructions
  1. Start with a 6 quart stock pot (you could use a 4 quart if you prefer). Put in ¼ cup Canola oil and ¼ cup butter or margarine. Meanwhile, take 2 pounds of white onions, cut them in half and then cut them into ¼-inch slices.
  2. Place the onions in the pot on medium heat, stir them a bit and then put the lid on. Cook the onions down until they caramelize before adding any water. After the onions have cooked for about 10 minutes, stir them good and turn stove eye down to 4 (if 5 is medium). After another 10 minutes and another good stir, turn the stove down to 3.
  3. After the onions have cooked 30 minutes, add 1 tablespoon of sugar, 1 tablespoon of minced garlic and 1 tablespoon of beef bouillon paste (chicken bouillon can be used).
  4. Let the onions continue to cook slowly keeping a close watch not to let them burn or scorch. When the onions cook slowly it lets them develop more sugar naturally giving the soup a sweeter flavor without having to add so much sugar.
  5. While the onions are cooking slowly remove the lid allowing more of the liquids to escape and the onions to cook down more. During this time the onions begin to turn a golden brown and the smell coming out of the pot will make your mouth water. My method may seem like it takes a long time, but it's well worth the effort. Just remember to keep a close eye on the onions stirring often to keep them from burning as they caramelize.
  6. Once they reach that golden brown consistency (about another 20 minutes), add 7 cups of water and cook for an additional 2 minutes.
  7. When the soup is ready, ladle it into bowls, add a dollop of sour cream and serve with homemade croutons.


Please follow and like us:

Side Dishes: Guacamole & Cole Slaw

Guacamole dip makes a delicious side dish

Guacamole dip makes a delicious side dish

With summer quickly drawing to an end and fall activities gearing up, it’s always good to have a couple of tasty side dishes you can prepare at a moments’ notice.

Today I want to share two dishes that are hits at our house. One is a longtime favorite and the other is one I came up with when I started out to make a salsa.

The longtime favorite is cole slaw and the new favorite is a delicious take on guacamole.

The guacamole dip came about this way. I had 2 avocados that weren’t as ripe as I had hoped, but I decided to use them anyway. I seeded, peeled, chopped and mashed them.

Next I added 1 teaspoon of onion powder, 3 teaspoons of lime juice, 1 teaspoon of Lawry’s Garlic salt, 1/4 cup of mayonnaise and 1/2 teaspoon cumin. These ingredient amounts came about a little at a time as I added, tasted and then added a little more.

Using a hand-held immersion blender I pureed all the ingredients together into a smooth and creamy mixture. This became perfect for a dip. In fact, the texture of the mixture is so creamy you could use it on sandwiches, hamburgers or hot dogs to replace mayonnaise or mustard if you wanted to.

Guacamole Dip

Rating 

This dip is great as a side dish or tasty as a snack
Ingredients
  • 2 Large avocados
  • 1 Teaspoon onion powder
  • 3 Teaspoons lime juice
  • 1 Teaspoon Lawry's Garlic Salt
  • ¼ Cup mayonnaise
  • ½ Teaspoon Cumin
Instructions
  1. Take 2 large avocados - seed, peel, chop and mash them.
  2. Added 1 teaspoon of onion powder, 3 teaspoons of lime juice, 1 teaspoon of Lawry's Garlic salt, ¼ cup of mayonnaise and ½ teaspoon cumin.
  3. Using a hand-held immersion blender, puree all the ingredients together into a smooth and creamy mixture. This becomes perfect for a dip. In fact, the texture of the mixture is so creamy you can use it on sandwiches, hamburgers or hot dogs to replace mayonnaise or mustard if you desire.


Homemade Cole Slaw as a side dish - The Surprised Gourmet

Homemade cole slaw is always good

Cole slaw is a great side dish that goes well with hamburgers and hot dogs. But is also makes a tasty side dish for full meals.

Taking a half of a medium head of cabbage, I chopped it up into pieces that would fit into the chute of my food processor. Next I peeled one large carrot. I put the cabbage and carrot through the shredding disc of the food processor creating a fine looking texture similar to angel hair cole slaw you would find in a grocery store.

Placing the cabbage and carrot mixture in a large bowl, I added 1 tablespoon of dried parsley and 2 teaspoons of celery seed.

Using a jar with a lid, I mixed 2 tablespoons of sugar, 3 tablespoons of apple cider vinegar and 1 cup of mayonnaise shaking the jar until the ingredients were well blended. Then I poured the dressing mixture over the cabbage ingredients until I got the desired moisture consistency I wanted, stirring well as I added. By mixing the dressing separately, you can adjust it to make the cole slaw as moist or dry as you prefer. The cole slaw comes out with a creamy, tangy taste.

To make the dressing mixture I used a mayonnaise jar, but a mason jar with a lid will work too. The cole slaw (covered tightly) will keep well in the refrigerator for several days.

Do you have any favorite side dishes that you can prepare at a moment’s notice? Do you have a favorite guacamole dip recipes?

Thanks for dropping by.

Cucina Felice!

Cole Slaw

Cole Slaw

Homemade cole slaw goes great with hamburgers and hot dogs or a full meal.

Ingredients

  • Half a Medium Cabbage
  • 1 Large Carrot
  • 2 Teaspoons celery seed
  • 1 Tablespoon dried parsley
  • 1 Cup mayonnaise
  • 3 Tablespoons apple cider vinegar
  • 2 Tablespoons sugar

Instructions

  1. Take a half of a medium head of cabbage, chop it into pieces that will fit into a food processor chute. Next peel one large carrot. Run the cabbage and carrot through the shredding disc of the food processor for an angel hair-type texture.
  2. Place the cabbage and carrot mixture in a large bowl, Add 1 tablespoon of dried parsley and 2 teaspoons of celery seed.
  3. Using a jar with a lid, mix 2 tablespoons of sugar, 3 tablespoons of apple cider vinegar and 1 cup of mayonnaise shaking the jar until the ingredients are well blended. Then pour the dressing mixture over the cabbage ingredients until you have the consistency you want, stirring as you go. Covered tightly the cole slaw keeps well in the refrigerator for a couple of days.
Schema/Recipe SEO Data Markup by Yummly Rich Recipes
https://thesurprisedgourmet.com/2015/09/03/side-dishes-guacamole-cole-slaw/


Please follow and like us:
« Older Entries Recent Entries »